How To Create & Restore From Time Machine Backup On Mac
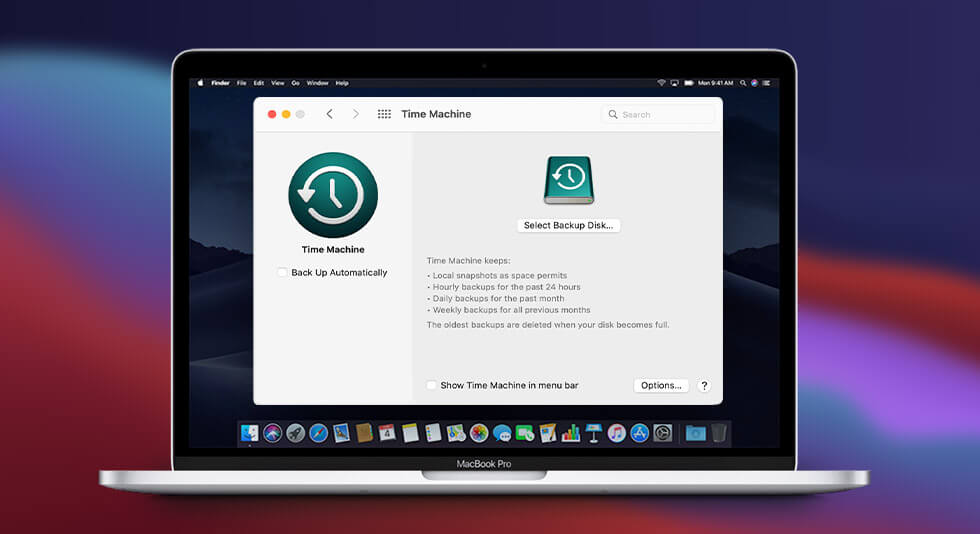
As a prudent Mac user, it is always a wise move to back up the files on your Mac. For this purpose, you can use Time Machine. This Mac’s inbuilt utility can help you back up your Mac or the data that resides within it. More specifically, Time Machine creates backups as mentioned below –
- Local snapshots as space permits
- Hourly backups for the past 24 hours
- Daily backups for the past month
- Weekly backups for all previous months.
It is also worth noting that Time Machine deletes the oldest backups as soon as your external backup disk is full.
Prerequisites For Creating backup Using Time Machine
To create a backup on Mac using Time Machine:
- One must have an external hard drive or SSD, which your Mac will format to make backups.
- The hard drive or SSD should have a large storage capacity to fit in backups.
How To Set Up Time Machine On Mac
The first step is to plug in your external hard drive to your Mac. Next, follow the steps mentioned below to configure Time Machine on your Mac:
Step 1: Preparing The Disk (For the First Time Users)
- Presuming it is the first time you are plugging your hard drive into your Mac, you will receive a prompt asking you Do you want to use (external hard drive name) (size) to back up with Time Machine.
- Click on Use as Backup Disk.
- Time Machine will automatically open up, and you will be asked if you want to erase your hard drive’s content. Before you move ahead, ensure you take a backup of your files in case you want them. Once you hit that Erase button, all the information will be destroyed. Wait till the disk is formatted.
Step 2: Creating Backup
If your disk is already ready to store backup files, then connect your disk and follow these steps to proceed:
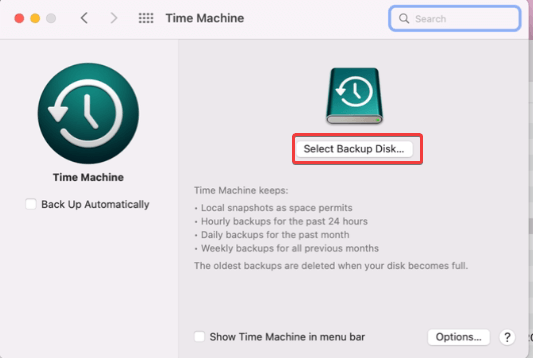
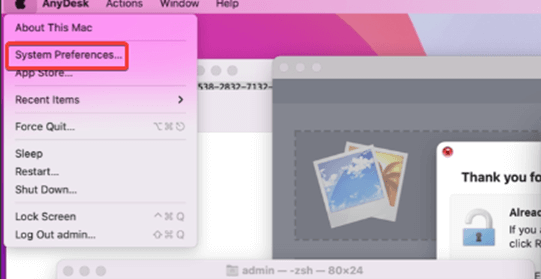
- Click on the Apple icon and open System Preferences.
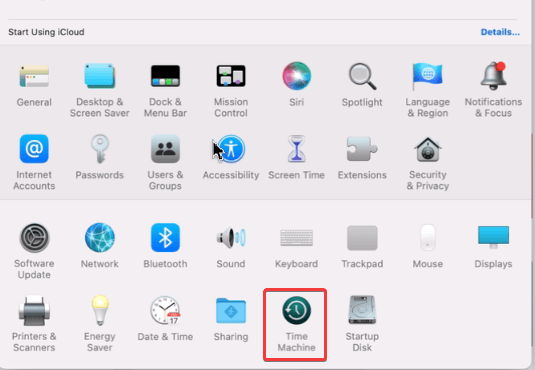
- Select Time Machine.
- Next, click on the Select Backup Disk
Select the drive for backup –
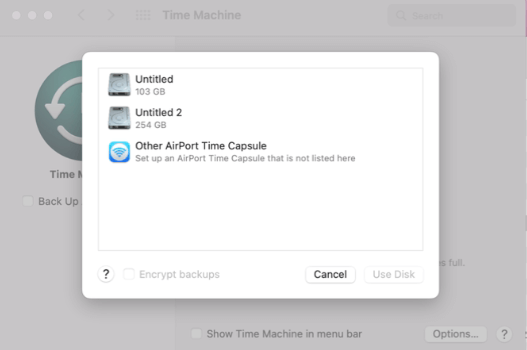
- Choose the disk from the list and click Use Disk.
Time Machine will start making backups periodically, without any instructions or further actions.
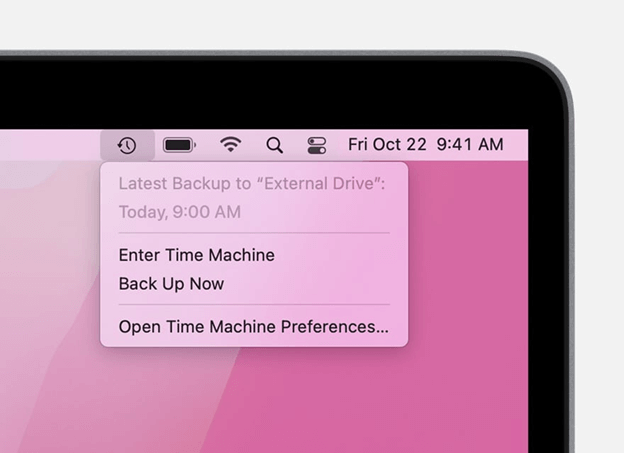
Note: If you wish to create a backup manually, you can click Back Up Now from the Time Machine menu present in the menu bar.
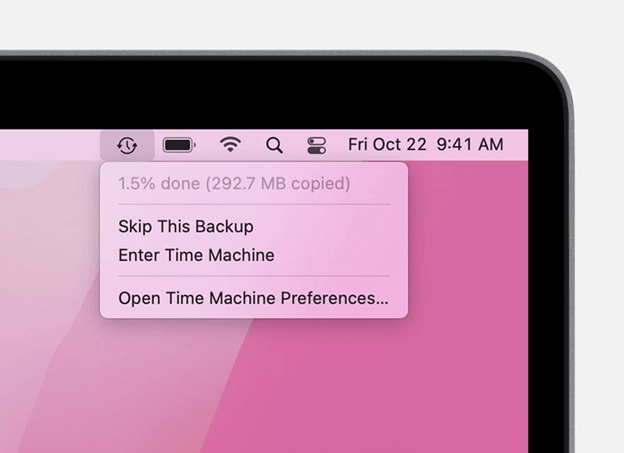
You can also perform other actions such as Skip This Backup, Enter Time Machine or alter Time Machine settings from the menu bar.
How To Restore Files On Mac Using Time Machine Backup?
First, ensure that your Time Machine backup disk is connected to your Mac. Now, follow the steps mentioned below to restore files on Mac using Time Machine backup:
1. Click on the Apple logo located on the top-left corner of the screen.
2. Click on System Preferences.
3. Locate the Time Machine icon and click on it.
4. Click on the checkbox that says Show Time Machine in the menu bar.
5. Click on Enter Time Machine.
6. You will see a screen where you will find all your old Time Machine backups.
7. Locate the file or folder that you wish to restore.
8. Click on the Restore button.
How To Restore Mac From Backup
Let’s consider a scenario where your Mac started to act up, maybe because you had installed an application from a corrupt source. In that case, you can restore your Mac from the backup –
1. Connect your backup drive and restart your machine.
2. When the startup disk is booting up, press the Command + R key combination together.
3. When you see the Apple logo, release the button and enter your Mac’s admin password.
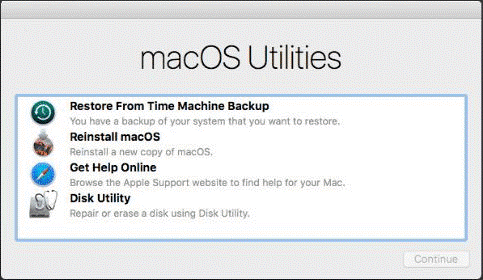
4. When the macOS Utilities screen opens, select Restore From Time Machine Backup and click on Continue.
5. On the Select a Restore Source, select your Backup disk and continue.
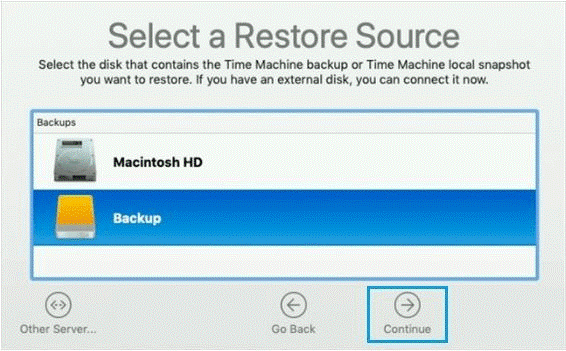
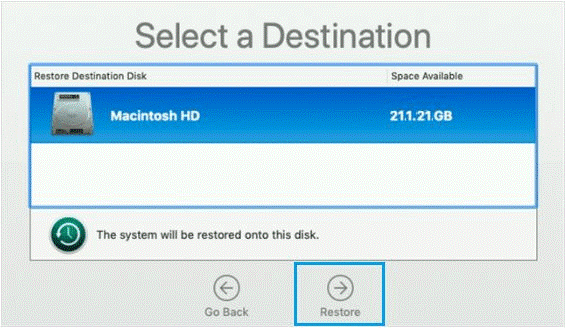
6. Select your Mac drive and click on the Restore button.
There you have it! You can now restart your Mac and check if your data has been restored as per your liking.
How To Delete Time Machine Backups
Now that you have seen how useful Time Machine is and how you can restore from Time Machine, let’s discuss another aspect of this wonderful backup utility: deleting old Time Machine backups. Let’s dive into two ways to do that. But before that, if you are curious about when you would need to delete old Time Machine backups on Mac, you can get an overview below. Else, you can skip to the ways –
| When Is There A Need To Delete Old Time Machine Backups On Mac? |
|---|
| Knowing the fact that Apple has designed Time Machine in a manner that incremental backups are deleted as soon as it runs out of storage, there are occasions when you might need to manually delete Time Machine backups. For example, you may require more storage space on your external drive so that you can back up more files. There might also be times when you may not be able to back up further or Time Machine may refuse to delete old backups to free up space. |
1. Connect the external backup drive.
2. Open the Time Machine utility using the steps we have already discussed above.
3. Locate the backup date you wish to delete.
4. Click on the three horizontal dots (…) from the top.
5. Click on Delete Backup.
6. Confirm that you want to delete the selected backup and then furnish your Mac password.
Wrapping Up
Now that you know how to configure and restore Time Machine backup, you will be at the least risk of losing your precious data. Do let us know if you found this post to be helpful. If yes, share it with all your friends and colleagues. And, for more such content, keep reading BestMacCleaner.
 10 Best Data Recovery Software for Mac 2024
 Best Disk Repair Software For Mac in 2024 [Updated]
 How to Check Storage on Mac | Free up Disk Space on Mac
 How to Recover Deleted Data Files on Mac