How to Recover Deleted Data Files on Mac
Try these easy ways and recover deleted files on Mac!
Have you deleted a significant file on your Mac? Oh! Were you working on an essential piece of information, and your precious photo/video/document got missing due to hardware failure? Sometimes, power outages can interrupt your regular operations, shut down your computer without warning, and can also result in the loss of unsaved data.
Well, in such scenarios, you might get panicky and ask yourself “what to do now?” Don’t worry! At BestMacCleaner, we’re at your rescue! In this blog post, we will talk about how you can recover deleted files on Mac in a couple of clicks. We will navigate you through simple, easy, and advanced ways, including taking the help of recovery software such as Stellar Data Recovery, to get them back!
Top Ways To Recover Deleted/Lost/Missing Files On Mac (2022)
Follow the list of effective workarounds suggested below to get back your deleted photos, videos, documents, and other multimedia files in a few moments.
Method 1: Recover deleted files on Mac when the Trash has been emptied
Difficulty level: Novice
The market has tons of hard drive recovery tools that can help you recover a wide array of deleted file types from empty trash. Today, we are talking about one such effective utility that can safely recover your precious files from the computer where Trash has been emptied too.
The ‘EaseUS Data Recovery Wizard Pro’ is an excellent Mac file recovery software for recovering deleted data on Mac in a few clicks. The application comes quite handy when it comes to restoring important files that got lost or deleted due to various data loss scenarios like virus attack, sudden system crash, power outage, storage getting formatted or human error. Using this Mac File Recovery Software, one can easily locate and retrieve lost photos, music files, videos, emails, documents, and more from Mac-based devices like HDD, SSD, SD Card, USB Drive, Camera, Fusion Drive, Time Machine Backup Drive and more.
Click here to download the software from the official website.
Follow the given instructions to quickly get your lost data back with EaseUS Data Recovery Wizard.
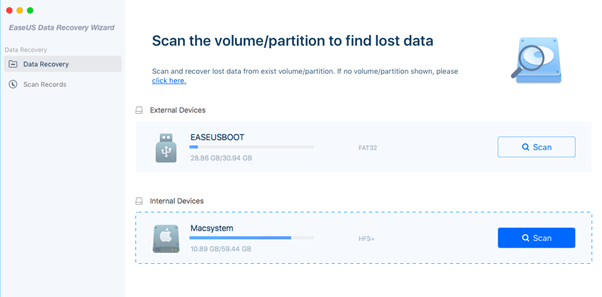
Step 1: Upon successful installation, launch the Mac data recovery software and navigate to select the location from where your critical data and files were erased, and press the ‘Scan’ button.
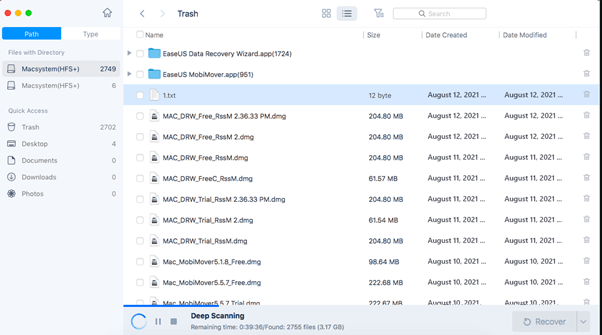
Step 2: The program will initially perform a rapid and thorough scan. After that, you will be able to locate all the lost/deleted/missing documents, images, videos, audios, and other multimedia files from the selected drive.
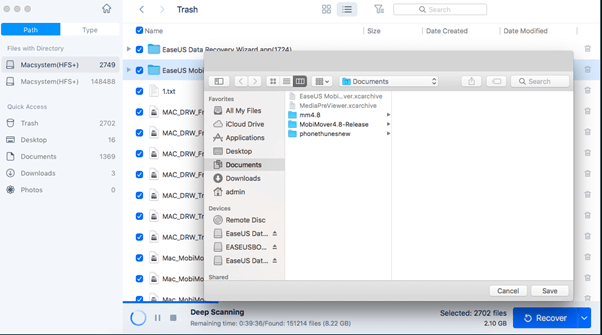
Step 3: It will present the entire report on the left sidebar. For recovering a file or a group of files, check the boxes and click on the ‘Recover’ button.
And that’s it! Isn’t this an easy way to recover your deleted files on Mac in a couple of clicks without investing much of your time and effort?
Reasons to use EaseUS Data Recovery Wizard
The data recovery software for Mac supports an effortless recovery of documents, photos, videos, audio, and more in a few clicks. It holds the potential to retrieve those files as well, that are lost due to virus attack, hard drive damage, operation error, repartition process, macOS wrongly restore issue, and so on. Additionally, all the retrieved data can be stored in cloud storage like Google Drive, OneDrive, and more. Hence, it is a complete feature-bundled app that is user-friendly too.
Pros:
- Support commonly used file formats and devices.
- Can retrieve data from reformatted drives.
- Fast & reliable performance.
- Easy sorting of deleted files and specific file types.
- Compatible with Mac, Windows, Android & iOS.
- 24/7 through email & live chat.
Cons:
- Admin credentials needed
Another worthy recommendation in the category of top data recovery software for Mac is Stellar Data Recovery. Let’s briefly take a look at what it can deliver to you.
Stellar Data Recovery
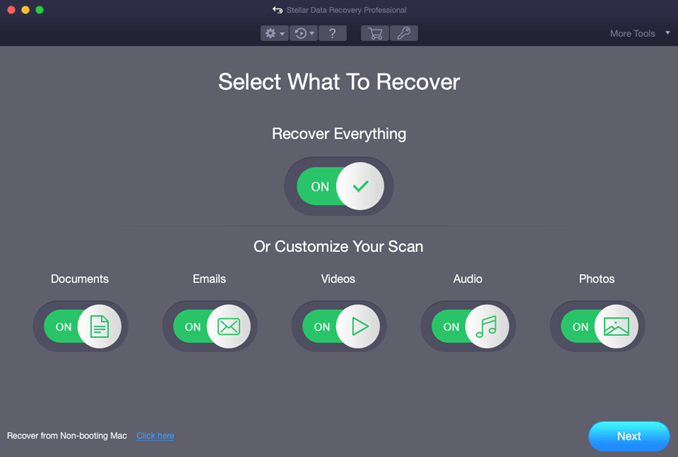
Stellar Data Recovery is a professional Mac file restoration program that allows users to effortlessly identify and retrieve deleted documents, photos, videos, audios, and more. It can even recover data from crashed or non-booting Mac (using a recovery drive) as well, which may lack in other file recovery solutions. The application holds the potential to regain files lost due to partition loss, USB corruption, and other data loss scenarios too.
- Technical Specifications: Supports almost all file formats, has compatibility with both external and internal devices, including external drive, disk, etc. Supports macOS Monterey 12, Big Sur 11, Catalina 10.15, 10.14, 10.13, 10.12, 10.11 . To learn more, click here.
- Price: It has five plans starting from $49.99/year only.
- Features:
- Restores deleted files on Mac even if it is crashed or the disk is partitioned
- Retrieves files from emptied Trash or even from formatted APFS/HFS+ partition.
Pros:
- Recover deleted files on Mac with any file format.
- Able to retrieve the deleted files on Mac through Office productivity apps, Pro apps, and even in-built apps.
- Multi-language support is also available.
Cons:
- Deep scanning is a little slow, which sometimes results in inconsistent data recovery.
Stellar Data Recovery is 100% free from viruses and safe to use. Over 2 million users trust them.
Want to know more about this fantastic file recovery software? Read the complete review here!
Method 2: Restoring deleted files from Trash on Mac using the Put Back option
Difficulty level: Novice
Did you accidentally trash the file or folder to the bin or accidentally press the ‘Delete’ button on a file, but have not cleared the Trash yet? If so, the following steps can help you recover your file.
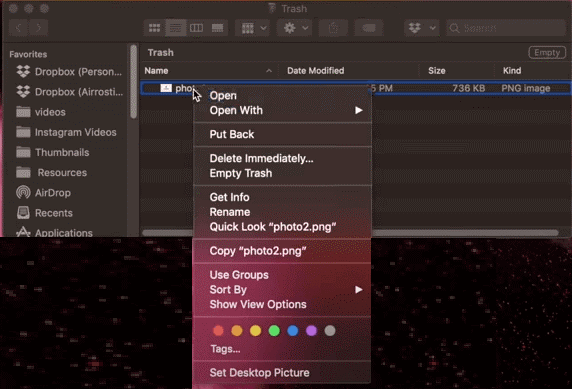
Step 1: Go to Bin or Trash and select the desired file or folder.
Step 2: Choose the Put Back’ option from the right-click context menu.
Step 3: Alternatively, you can pick the file in the trash, select edit, and copy the file name. Later, you just need to paste it into your preferred folder, where you want to save the restored file.
Reason to use this method:
No additional software installation is required.
Pros:
- Easy to search for deleted files/folders.
Cons:
- Auto-empty feature empties Trash every 30 days
Method 3: Retrieving deleted folders from Mac using Time Machine
Difficulty level: Medium
Time Machine is the freeware backup tool that comes pre-installed with your Mac. Despite being a great backup solution it’s a valuable tool to restore deleted files/folders as well without any hiccups.
Step 1: On your Mac, open the window and go to the particular folder where your deleted file resided. So, let’s say the file you deleted was in your Documents folder. Now, open your Finder window for the document.
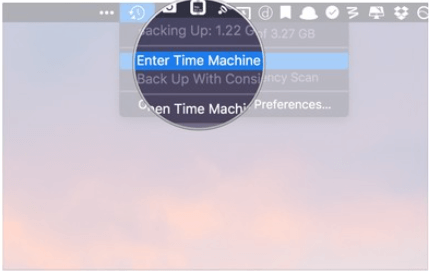
Step 2: Navigate to Time Machine by clicking the clock icon (available on your Mac menu bar) and tap on ‘Enter Time Machine’.
Step 3 : Next, you will see items within your Time Machine. Locate the one you want to restore.
Step 4: Press the spacebar to preview the file. Else, simply select the file/folder. Finally, click on the ‘Restore’ button to recover the deleted file on your Mac.
Reason to use this method:
The Time Machine backup method is a great option if you have backed up your data in the recent past.
Pros:
- Allows recovery even after physical damage
- 100% reliable
Cons:
- Can be used only if the backup of data is up-to-date
Must Read: Best Video Recovery Software For Mac To Use In 2022
Method 4: Using Terminal to restore deleted files on Mac
Difficulty level: Hard
The Terminal app is also an excellent tool to help you recover deleted files on Mac. However, it is only useful if you know the file name and has not erased it from the Trash. Follow the given steps to retrieve files using this tool:
Step 1: Open the Finder tab (available on your Mac menu bar ).
Step 2: Navigate to the Applications option, then to the Utilities folder, where you will locate the Terminal app. Open it.
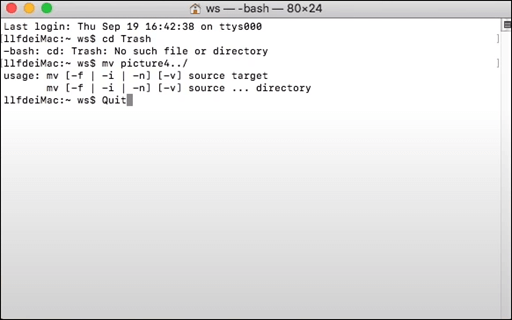
Step 3: Next, manually enter this [cd—trash] command. Press the Return key.
Step 4: Enter ‘mv filename../’ and press Return again.
Step 5: Exit the app and your files will be restored.
Reason to use this method:
The Terminal tool comes in handy for recovering your deleted data quickly. However, it may require technical assistance due to its coding complexity.
Pros:
- Fast to use once you are clear about what to do
- Useful alternative to GUI of Trash
Cons:
- Bulk recovery is not possible
- Exact file name should be known
Wondering if there’s a dedicated solution to find and recover deleted/missing/lost photographs from your Mac? Check out the best solutions here!
Bottom line
We hope this article helped you understand how to retrieve deleted files on Mac by introducing you to the four most feasible methods, through which you can now easily recover your deleted files on Mac. So, depending upon your use-case, you may apply any of the four aforementioned workarounds and restore your deleted documents, videos, photos, music files, and more in just a few clicks.
We suggest that if you don’t have a data backup, go with Method 1 which suggests using a reliable Data Recovery Solution. But, if you already have an up-to-date backup, we recommend taking the help of Time Machine as the best practice to retrieve your deleted files on Mac.
We wish you a happy restoration!
FAQs (Frequently Asked Questions)-
Q1: How do I recover permanently deleted files from my Mac?
A: Some applications allow you to recover the permanently deleted files from Mac, which are easy to download and safe to use. We recommend using EaseUS Data Recovery Wizard or Stellar Data Recovery for this purpose. You download and install the product to run a scan and can recover files found by the tool by clicking the Recover button on the tool.
Q2: How can I recover permanently deleted files from Mac without any software?
A: You can use Time Machine to recover the permanently deleted files from Mac. It is the inbuilt software in Mac devices that backs the data in external storage devices. Enter the Time Machine, and you will be able to view both the recent and older versions of deleted files. Click the Restore button to recover the files.
Q3: Where do deleted files go on a Mac?
A: The files deleted in Mac go to the Trash folder. The files remain in the Trash folder until you delete them manually. The auto-empty option empties the Trash folder every 30 days.
 Best iPhone Data Recovery Software for Mac in 2024
 AnyRecover Data Recovery Software For Mac: Complete Review
 Top 10 Partition Recovery Software For Mac 2024