How to Hide or Unhide Files Using Terminal on Mac

Being a Mac user, every day I Google search how to show hidden files Mac and terminal commands, but every time I search I do not get the exact stuff I want. So, I researched a lot and made short easy reminders to speed up the process and do not waste time in Google Search.
Therefore, I thought let’s write a blog and help everyone on how to hide or unhide files on using Terminal on Mac. Through this blog, I am going to show short commands for Mac terminal and view hidden files and folders on Mac.
Let’s get started.
A short way to view hidden files Mac
From a recent release of MacOS, we can now use shortcuts. Let’s see the shortcut to view hidden files on Mac:
CMD+SHIFT+.
You can press these keys to show hidden files and to again hide them you can use the same keys.
Additionally, if you are using a version older than MacOS Sierra, you can set up Mac terminal commands. In case, you do not know how to set up a Mac terminal, scroll down to the blog on the heading: Show or Hide Files using Terminal Aliases.
Hide and Unhide Files on Mac
The below mentioned steps are to view hide and unhide files on Mac:
- Open Terminal found in Finder?Applications? Utilities
- “Defaults write com.apple.finder AppleShowAllFiles Yes” in the terminal, paste the command.
- Press key on “return”.
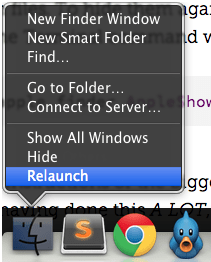
- After this, hold the “Option\alt” key and then right-click or tap on the Finder in the dock. After doing this, click on “Relaunch”. (Like shown in the below screenshot)
Hold the “option\alt” key to relaunch the finder by right-clicking on the Finder icon.
After relaunching, the Mac will show all the hidden files. In order to hide the files again, you can follow the similar steps but you will need to replace the Terminal command as:
Defaults write com.apple.finder AppleShowAllFiles No
For you, might be it feels like a long run or hard way to hide or unhide files on using terminal on Mac but if you will try this technique multiple times, I bet it is worth spending few minutes on these commands to save more time in the future.
Show or Hide Files using Terminal Aliases
Multiple commands or shortcuts are termed as Terminal Aliases. You can setup Mac terminal commands in just one step and can avoid the above mentioned 4 steps:
You can make a temporary alias (only for the use of one terminal session) or permanent as well. Follow the below-mentioned step to create temporary and permanent aliases.
- Open Terminal found in Finder?Application?
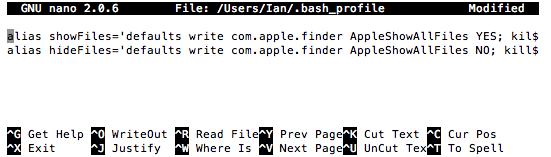
- “sudo nano ~/.bash_profile” in terminal copy and paste the following.
- If required, enter Mac’s admin password and hit return.
- “alias showFiles=’defaults write com.apple.finder AppleShowAllFiles YES; killall Finder /System/Library/CoreServices/Finder.app’” copy and paste the following at the bottom of the “open.bash_profile file.
- After following the step, copy and paste the below mentioned commands:
“alias hideFiles=’defaults write com.apple.finder AppleShowAllFiles NO; killall Finder /System/Library/CoreServices/Finder.app’”
- After copy-paste, press ctrl+O and press return in order to save the file or folder.
- After saving the file or folder, press ctrl+X in order to exit the file or folder and return to the Mac terminal command setup.
- After returning to Mac terminal command, copy and paste the following:
source ~/.bash_profile
Also Read : Best Mac Apps 2020- That Every Apple Newbie Should Install
In order to refresh the profile and makes the terminal aliases available.
The below-mentioned screenshot is the reference to add aliases to .bash_profile via Terminal:
Furthermore, when you wish to show hidden files, type “showFiles” in Terminal and then type “hideFiles” when you wish to hide the files again. In this order you can hide and unhide files on Mac.
Additionally, if you wish to modify the alias name or the behavior, let’s see how we can use terminal commands to modify:
alias showFiles=’defaults write com.apple.finder AppleShowAllFiles YES;
killall Finder /System/Library/CoreServices/Finder.app’
- When we add a new alias, the terminal tells that we are adding an alias.
- Meanwhile, showFiles is the term referred to by the You can here change the name of the alias as per your wish.
- After this, we give two commands to the alias wherein the first command is:
defaults write com.apple.finder AppleShowAllFiles YES;
The above-mentioned command to show or view hidden files and it ends with a “;” semicolon so that we can further provide the second command:
killall Finder /System/Library/CoreServices/Finder.app
The second command basically relaunches the Finder (in order to replicate the step to hold the “option\alt” key and then right-click the icon Finder in the clock).
Wrap-up
Through the alias Mac terminal commands set up, all we need to do is “showFiles” and “hideFiles” in order to hide and show the hidden files or folders on Mac respectively.
The aliases are used to boost up or speed up the interaction with the Mac terminal commands. To set up an alias for the navigation of your most used directories, you can commit to a “GitHub repo” and so on you can use various commands and aliases.
Through this blog, we have learned to:
- Show hidden files and terminal commands
- View hidden files on Mac
- Show hidden folders on Mac
- How to unhide folders on Mac
- How to unhide files in Mac
- View hidden files and folders on MacOS
- Unhide files or folders on MacOS
I hope you like this blog. For more such technical information and content, subscribe to our website. Additionally, if you face any issue in the process, comment down in the below section and let us know.
Thanks for reading.
Must Read:
Review: Disk Clean Pro Is The One-Stop Solution For Your Mac Cleanups
How To Fix ‘Your Startup Disk Almost Full’ On Mac OS?