How To Fix It: External Hard Drive Not Showing Up On Mac

Whenever we insert an external hard drive in the USB port of Mac, you can see it mount on the desktop. You can also check the external drive connected by navigating to Finder (left-hand column under Devices). However, if you are facing external hard drives not showing up on the Mac issue, we understand the annoyance. So, why is it that this error appears and the hard drive is not mounting on Mac, let’s figure it out.
Apart from the faulty cable or issues in the USB port, other reasons for the error and the common solutions include:
- If your USB connector is damaged?
- If your cable wire is defective? You may try another cable to connect the hard drive.
- If there is any hardware issue with Mac, try connecting the external hard drive with a PC.
- Reboot your Mac to try connecting the external hard drive.
- Try resetting NVRAM whose description is give below.
If you have gone through a quick check, but the external hard drive is not mounting on Mac, you may need to try the possible solutions mentioned below.
Fixed: Mac Not Recognizing External Hard Drive
| Fix 1: Check Finder Settings |
| Fix 2: Run First Aid On External Hard Drive |
| Fix 3: Delete Useless Files |
| Fix 4: Reset NVRAM Fix |
| Fix 5: Run Mac Diagnostics |
Fix 1: Check Finder Settings
If your Mac is not prepared to detect the external hard drive, the error is likely to appear. To clear the path, follow the steps below.
Step 1: Go to the Finder window.
Step 2: Here, open Preferences > General
Step 3: Make sure that the checkbox of External Disks is enabled.
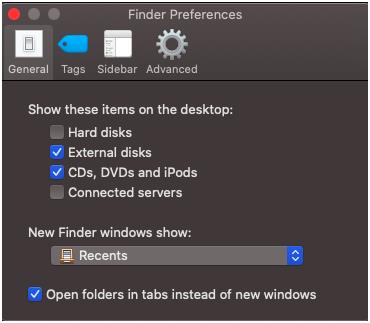
Once the settings are activated, check if the external hard drive is connecting or not. If not, try another method.
Must Read: CleanMyMac X VS. MacBooster 8 – Side by Side Comparisons
Fix 2: Run First Aid On External Hard Drive
Your Mac may need a first aid checkup if the external hard drive is not showing up on the Mac. It is because First Aid for Mac is meant to clear out the possible technical glitches that arise due to corrupted files and apps. It also helps in solving issues related to hard drives. So, run the First Aid by following the steps below.
Step 1: Go to System Preferences and open Disk Utility. Or you can spotlight Disk Utility and click it open.
Step 2: Click the first tab above, mentioning ‘First Aid.’
Step 3: Select Run when prompted ‘Run First Aid On Mac.’
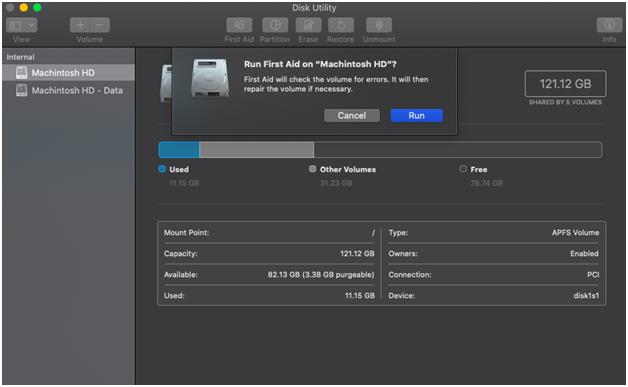
Once it runs and finishes its job, you can try connecting the external hard drive to Mac again.
Also Read : CleanMyMac VS. CCleaner – Which Mac Cleaner is The Best?
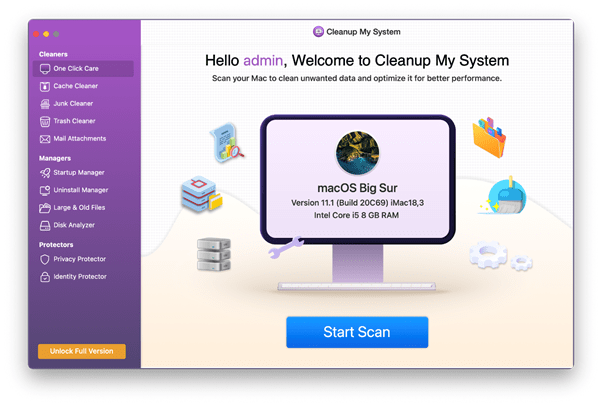
Fix 3: Delete Useless Files That Gets Accumulated Over Time On Your Mac
To free up your system from junk files, caches, cookies, log files, temp files, and other unwanted residuals that take place on your Mac, you should consider using a dedicated Mac Cleaner & Optimizer. For this, we recommend using Cleanup My System that not only helps remove incomplete uninstallation of the applications but also optimizes the system for renewed use.
Step 1: Install Cleanup My System on your system. You can click the button provided below to get your hands on the latest version of this top Mac Cleaner.

Step 2: As soon as it is ready, an automatic system scan or check-up will occur. This scan helps in detecting junk, the browser’s privacy, and more. You must choose ‘Clean Now’ for the overall optimization of your device.
In case no scan gets initiated, you can navigate to the One-Click Care module and run a comprehensive scan to find potential residues and unwanted data that get accumulated over time and are responsible for hampering overall performance.
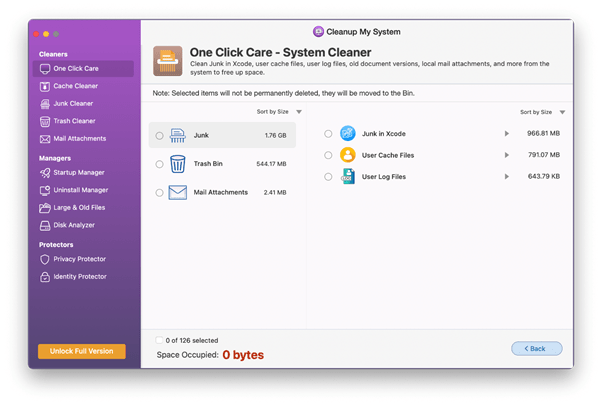
 Step 3: Below you can check the junk files, user cache files, log files, old document versions, and other data that has been detected for quick cleaning. You can select the ones you wish to delete!
Restart your Mac and connect your external hard drive to the system now. If the problem was associated with app conflict, your external hard drive might be able to work now.
Fix 4: Reset NVRAM
Non-Volatile Random Access Memory or NVRAM is a small amount of memory where Mac stores some key settings. However, a sluggish behavior of Mac or drive issues creates annoyance, and you can try resetting NVRAM.
Step 1: Shut down your Mac by visiting Apple Preferences.
Step 2: Now, as you start your Mac, press, and hold keys Command+Option+P+R at the same time. Now you will hear the chime sound. Continue holding the keys, and startup sound will appear again.

As NVRAM is reset successfully, you can find if Mac is not reading a hard drive now.
Fix 5: Run Mac Diagnostics
If all of the above methods haven’t worked right for you, you can try running Apple Service Diagnostic, and it will help manage hardware issues on your Mac. For this, follow the steps mentioned below.
Step 1: Disconnect all the devices connected to your Mac, including an external keyboard, mouse, or any other drive attached.
Step 2: Now, reboot your system. Suppose the power is off, power it on.
Step 3: Now, long-press the ‘D’ button until the language section displays. Here, choose the preferred language.
Step 4: As the diagnosis is done, the screen will display all the possible solutions.
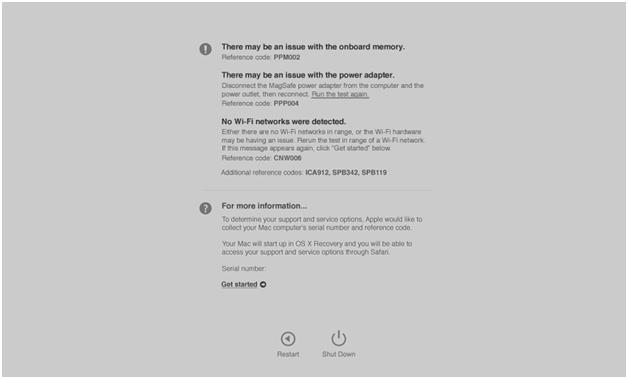
Step 5: Follow them and get your external drive connected once again.
And you will probably be able to resolve Mac not reading a hard drive.
How To Recover Or Retrieve Lost Data From Hard Drive?
It is always recommended that you store your data not just on an external drive but also on a cloud-like Right Backup that is compatible with Windows, Mac, iPhone, and Android with one account.
In case the data is not settled in the cloud, you can use Disk Drill or any other third-party tool that needs to be installed in the system. After that, you can connect your external disk. Now navigate yourself to the recovery option and get the data back in one go. It might take some time to fetch the lost data, but once done, make sure that you eject the drive very safely without damaging the drive or the cable attached to it.
FAQs: External Hard Drive Not Showing
1. Why is my external hard drive not showing up on my Mac?
There may be various reasons why your external hard drive is not mounting like faulty cable, incompatible selected preferences, presence of conflicting apps, or hardware glitches.
2. How do I get my hard drive to show up on my Mac?
The answers could be many. You can edit the Preferences section, and enable the external drive, delete conflicting apps from the system, remove junk, run Mac diagnostics, run First Aid from Utilities, and try resetting NVRAM. One of the above methods helps in showing your hard drive up on Mac.
3. How do I force my Mac to mount an external hard drive?
After opening Apple’s Disk Utility, click the option to Mount and make it visible on the desktop. This way, you will be able to show an external hard drive to the system.
4. How do I revive a dead hard drive?
Try repairing your hard drive by opening Disk Utility > Continue > View > Show all devices > First Aid > Run. If your hard drive is not repaired with the method or the data has been corrupted, you may need to use a third-party tool to recover it all.
Wrap-Up
We are hopeful that your problem of external hard drives not showing up on Mac has probably been solved using the methods above. In case if you haven’t been able to get your external drive not mounted on Mac or the data has been lost due to any means, you may need to recover using third-party software. However, it is also recommended that you must be careful in disconnecting your hard drive from the system so that no damage is likely to occur.
 10 Best Duplicate File Finders for Mac In 2024
 Best Browser For Mac in 2024: Fastest & Lightest
 Best App Uninstaller For Mac In 2024
 Best Mac Hard Drive Clone Software In 2024
 10 Best Mac Temperature Monitor Apps In 2024